Wednesday, 4 May 2022

Polar Lights Ecto 1

Not a great kit. It's a rushed movie tie-in kit with major quality and fit problems, and a few inaccuracies. But it's the only kit of its kind so you have to make the best of it. And I think I have. If you attempt this kit, I advise cutting off all the major locator lugs and manually aligning pieces. This kit is designed for the non-serious modeller which actually makes it harder for those who do want to do a serious job of it.

This kit comes with the chrome pieces already chromed but it looks naff so I stripped them and repainted them in Vallejo Metal Color chrome, which makes it look more realistic and closer to the movie Ecto 1 - which was still a banger even after a refurb. 

This kit comprises of two main colours; red and white gloss - two notoriously difficult paints to work with. This this kit is always going to be hard to do well and is less forgiving than military vehicles where mistakes can be weathered out. Consequently this isn't quite as good as I hoped it would be, but from a few feet away it still looks mint. And it's an Ecto 1. What's not to love?

With the release of Ghostbusters Afterlife you would think there would be a market for a new kit or at least a rerelease of this one, but this one is rare as hen's teeth and very expensive. I got lucky with this one at just under £40 - which is still substantially cheaper than a half decent die-cast of a comparable scale.

Were I to build it again I would seriously consider a white glass rattlecan rather than Tamiya white gloss. I ended up having to use a Revell gloss varnish which doesn't like post effects and takes a long time to properly cure so there may be fingerprint problems.

Masking off the red wings was particularly tricky. I'm used to doing a half arsed job and touching up afterward but with this one it really pays to get it right first time if possible. This is a lot different to military kit building and it isn't very forgiving. 

Lucky for me, I get another shot at this as I bagged an Ecto 1A from Ghostbusters 2 just in case I didn't win this one on ebay. It's not quite as pretty but the intention was to heavily weather this one to represent the Afterlife Ecto, and do a clean 1A. As it happens this one is too nice to spoil with weathering. In any case the artificial weathering on Afterlife Ecto in the film looks rubbish. I don't want to risk spoiling this one because it's gorgeous. 

Friday, 29 April 2022

1:48 HobbyBoss TBM Avenger


This is a kit that challenges the definition of what a good kit is. It's a complete paradox. The decals are bad, the instructions are bad, it's badly engineered, there are major fit issues, and you get the feeling that this just hasn't been road tested before release. But it's a good kit all the same. 

The major hurdle is shoehorning the interior assembly into the fuselage. It just doesn't fit. Much of the interior detail broke up in the process, then I discovered the bomb bay doors have to be split into four pieces to display the torpedo. I chickened out and the bomb doors are closed.

Being that this is a carrier bird it has the option to have the wings folded away, so the wings have to be joined to wing stubs, where again there's been little thought as to how they attach, and the modeller is left to guess. Like the HobbyBoss A6 Intruder, the wings are precariously mounted and could fall off at any time.

Usually I have nothing but praise for HobbyBoss but I'm now spotting the pattern. They are mostly fine but they do have alignment issues that would make a 1980's Rover car builder blush. On this one the canopy assembly is particularly bad, and the instrument shield didn't fit at all. I ended up having to fashion one out of filler.

I came very close to abandoning this one as I started to lose my enthusiasm for it. I have seen it done well and was hoping to knock this one out of the park, but after all the faff I just wanted it out of the way. It's a shame because it would have really benefited from hairspray chipping and other advanced techniques.

Because of the fine surface detail, the weathering and finishing process was fairly simple - and quite effective, though I really don't like HobbyBoss decals. They don't really respond to decal softener solution. For all that, though, I did eventually manage to bash it into shape, and you can't really argue with the result. If it comes out this well then by default it's a good kit, but it has no right to be called a good kit.

At £25 you do get a lot of aeroplane and a lot of kit for your money. HobbyBoss is just the right level of detail without going overboard, and just within the affordable bracket. It's definitely not for beginners though. Better modellers than me have struggled with this one for the same reasons. I'm glad I bit the bullet though. It's an imposing beast on my shelf - and almost as big as a Phantom. The Avenger was not by any means small.       

Thursday, 21 April 2022

Italeri 1:48 F14A Tomcat

I built this exact kit about three years ago when I was just starting out with an airbrush. I completed it but it didn't go particularly well and it didn't survive the house move. I've had it in the back of my mind for a while that I needed a second attempt because when it comes to aircraft the F14 is a good benchmark. You're only as good as your F14 attempt.

I was going to attempt this one last year having bought the same kit but then decided to sell it on Ebay as the decals didn't provide for a flat grey scheme and an extra set of decals would have pushed up the price to the point where I may as well have bought an expensive F14 kit.

If forgot about that logic though, so last month when I saw this one on sale for £20 I bought yet another one. Only when it arrived did I remember I needed an extra decal set, so this ended up costing far more than I wanted. If I'd researched it I could have gone with the HobbyBosss which is a far superior kit. (At twice the price it ought to be).

From memory I had this down as quite a good kit but with three years of intensive experience under my belt I've revised my opinion. It's not a good kit at all. The cockpit section join goes along the side of the fuselage and to make it fit you have to fill and sand it, taking some crucial detail off in the process. The gun port is barely defined, the Phoenix missile rails don't fit, the interior is far too basic, the exhaust ports are lacking, and the main body part is brittle and prone to cracking. The wing is all one piece with no folding flaps or slats. It really isn't sophisticated. 

Having researched the market in F14s in 1:48 I can say with confidence that this is by far the worst offering which is why you can bag it for £20.

That said, you can pay up to £80 for a decent Tomcat. The Tamiya one seems to be the one to get for a good balance of quality and detail, though the Avantgarde Model Kits F14D has an amazing level of detail and is substantially cheaper. I'm tempted but for my purposes there's too much detail. 

The compromise between the two seems to be the HobbyBoss which also looks like a very fine kit - and costs the same as the Italeri after you've bought extra decals. I've never had a bad HobbyBoss kit. The A6 Intruder I built had some panel fitting issues and a few inaccuracies, but nothing could be worse than this Italeri.

But wait up a minute! Just because it's a bad kit doesn't mean you can't get a good result. I set out to do a ghost grey Tomcat to the best of my ability and it's come out fine. I really like it and there's no reason why a competent modeller shouldn't be able to knock it into shape. The result has its shortcomings but nothing the casual observer would notice. 

For this one I again attempted pre-shading which didn't really work so most of the panel line accentuation is either airbrush post-shading or oil paint weathering. I used some mottle stencils for some of the surface effect but it didn't really work for me. The pattern looks a bit obvious and I've seen it appearing on a lot of models lately. Oil paint weathering will do most of the job, 

For the decals I used the Furball Aerodesign PtX set. They're decent enough (expensive) though I suspect they're not the most accurate, and the placement diagrams are useless. I had to improvise, and it didn't help that the Italeri instructions aren't that good either. Finding usable reference photos is harder than you might think, so much of the decaling was guesswork.

For all that, I think the HobbyBoss Tomcat is going on my shopping list just because I want to see what a good one looks like. At any price the Tomcat is worth the money because there's a lot of aeroplane there. It's not nicknamed "the big fighter" for nothing. Most of all I need to have a bash at one that doesn't join down the side of the fuselage so I can go to town on the panels. On a Tomcat it matters. 

I would say the Italeri is a great beginner's kit, and the scheme supplied with the kit looks very fetching, and at £20 it's a good practice piece. That mine has ended up being one of my best ever builds is just icing on the cake. Since my modelling budget is tight these days, and after some high intensity projects, it's a real pleasure to get so much from something so basic. By that measure, I can't really call it a bad kit.

Wednesday, 20 April 2022

Airfix 1:72 RAF Bomber resupply set


You can't build a Lancaster and not go the rest of the way. This set of vehicles is a hugely worthwhile endeavour. Goes together like a Japanese meal - small portions, but greater satisfaction.  

Airfix 1:72 Bristol Blenheim


I didn't like this kit at all. The glassware isn't good and the three part engine cowl assembly is pointless and stupid. Here the camera makes it look better than it is. I didn't enjoy building this one and I didn't like the result enough to have it on display. In all honesty I think 1:48 would suit this aircraft better. If you want something from Airfix at this size and scale, get the Beaufighter.     

The Airfix 1:72 Luftwaffe


These are two of the new generation Airfix kits. They're as good as it gets and easy on the wallet. For these I'd run out of primer but went ahead and painted them anyway. That led to multiple touch-ups as fingernail scratches went right down to the plastic. For all that, though, I would say the thinner coat makes a real difference to the finish. It's caused me to switch to a more expensive lacquer primer in the hope of getting the same effect. These go together well and both were completed in just a few hours. Nice no-fuss projects.   

Italeri 1:72 Lockheed SR-71


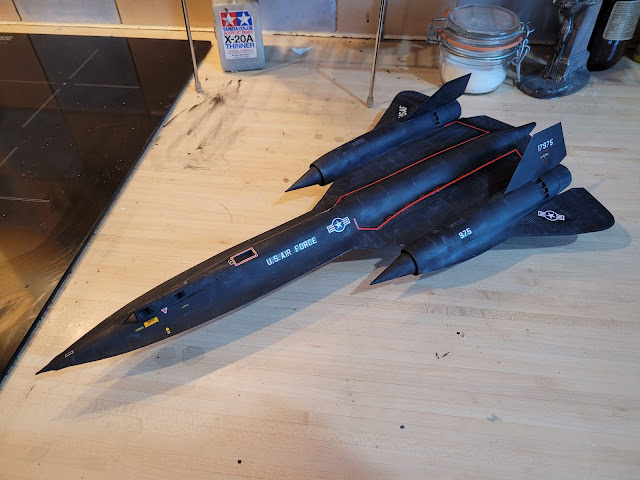
This is an old tooling that was never that great to begin with. The main parts don't fit particularly well, it has horrible raised panel lines and it lacks fine detail. That said, with half a tube of filler and a lot of sanding, you can knock it into shape. Once the build is sorted, the rest comes together with ease. There isn't much to it. For weathering I've used subtle white dry-brushing and dab wash of white oil paint. It really brings it alive, For a cheap palate cleanser this is a nice subject. It is quite large though. It's longer than a Vulcan and will take up a lot of shelf space. The new 1:48 Blackbird must be massive. 

Revell 1:48 Lockheed Ventura


I don't feel like I did justice to this one but it's competent enough. It looks better in the flesh. It's an unusual kit this one because it's not an old tooling, it's really well engineered, the decals are great and it's very cheap. What's more, there's a lot of aeroplane for your money. I think the Ventura is a beautiful aeroplane and really nice project to go to town on. There's scope for more advanced weathering and if by chance I happen upon some replacement decals, I will probably strip it and have another bash. There's just something about it. One of the few kits I unreservedly recommend. That's all there is to say about it.  

Saturday, 16 April 2022

Roden 1:48 Bristol F2B


This kit is a bit of a paradox. The instructions are bad, the decals are absolutely useless and the parts don't fit as well as they could. It's difficult to build, quite badly engineered, yet for all that, it's scrubbed up nice and it's a really enjoyable little project. I've been meaning to test my modelling mettle with a biplane for a while, and there's just something about the F2B I find attractive. 

I used stretched sprue for the rigging, which is adequate for a model this basic, being that there are no actual contact points for rigging but it still feels a bit of a cop out. All the same, if you can even build this one then it's an accomplishment in itself. That it came out this well is something of a small miracle.

These tend to go for about £23 though it looks like there is a similarly priced one by Revell (a reboxed Eduard) which looks to be a far superior kit with better instructions. I would avoid the Roden if I do another. I feel this aeroplane would be better in 1:32. It's a good size in 1:48 but it's the sort of project you should really be able to go to town on. It will test most of your modelling skills.

I particularly enjoyed mastering the wood effect for the propeller and struts. I painted them an off white/yellow then used burnt umber oil paints, leaving long brush marks to simulate wood grain. I then sealed it with Tamiya orange clear coat. Once cured you can shine it up. Very simple and easy effect but massively rewarding.

This is my first proper attempt at a biplane, but certainly won't be the last. This experiment has opened up a whole new avenue of modelling, and now I'm looking at kits I never would have given a second glance.

Around 5000 F2s were built, and I learned from the IWM website that 52,000 aircraft were built in WW1. I never realised the scale of the WW1 air war, and have now resolved to fill that gap in my knowledge. That made this exercise all the more worthwhile. 

Thursday, 7 April 2022

1:72 Hobby Boss Lynx


Rarely do I have unreserved praise for a kit, but this one by Hobby Boss is absolutely superb. More or less everything just fits and there's no fight to install the interior because there are decent sized locator lugs. This requires only minimal filler. The underside fuselage join is not quite aligned and there are some fit issues with the windscreen, but that's very easily solved.

Here I don't think the photo does justice to the end result. My phone camera seems to amplify all the flaws. What you get for a mere £15 is a very neat, easy to build and good looking little helicopter.

It would be better if the screen wipers were separate components and the intake guards were photo etch, but apart from that it is a rarity that you find a kit this pleasurable. I already want to do another.      

Friday, 1 April 2022

Meng 1:35 King Tiger


Having built the Ryefield Panther, I got something of a taste for German armour so when I spotted this special edition King Tiger by the Tank Museum for a mere £24.99 I couldn't resist. 

I thought with this one being a link and span track assembly it would be easier than the Ryefield Panther's individual links, but it's actually a lot more bothersome and harder to weather. The tracks are quite brittle and the plastic jig they supply isn't much help.

That said, this is an outstanding kit. The Ryefield was a nightmare because it was packed with largely invisible and unnecessary detail. This Meng kit, however, is every bit as good with a far fewer parts, and very little in the way of photo etch nonsense like Ryefield. I really don't like photo etch parts. They don't add much and they're difficult to glue and paint, and being that model building is all about painting and gluing things, the fewer PE parts the better. This Meng kit doesn't lose anything for it.

This is my second attempt at German ambush camouflage and I think it's worked better than my Patnther. The colour balance is better from using a brighter yellow. Still, though, I don't think I've cracked it yet. My scheme is a little too regimented, and it would benefit from a more randomised pattern. I would have done it freehand but I'm really struggling with flow problems at the moment. Cheapo Chinese airbrushes have their limitations.

Usually I stick with the cheaper brands for vehicles because the price leap after a Tamiya is considerable, but when you build something like this it's easy to see why the higher end kits cost more. There's nothing at all wrong with Tamiya kits but as a rule they only give you the bare minimum, and some of them really are showing their age now. Tamiya is is gradually being eclipsed by newer brands, and their range hasn't evolved much in thirty years. If this is the general standard of Meng kits then I'm a convert.

Build wise, once you've got the tracks assembled and mounted, everything pretty much falls together. The parts are nicely defined and there are no major problems. The instructions could be clearer but an experienced modeller should be able to muddle through. Other than that, you get a lot of bang for your bucks.

Saturday, 19 March 2022

1:35 ICM Zil-131 Emergency Truck


I wasn't sure what to expect from an ICM kit at this scale. I've built three of their 1:72 kits and they're not the best quality, but they still scrub up ok. I'd say this was about the same. This one is lacking in detail and very basic. That said, it's done well. It's far better than the Revell M34 and it fits together with no real problems. The instructions are also pretty good, If I had to sum up this kit with one word it would be "adequate". It gives you everything necessary to get a fine result, but no more.

That said, there's nothing wrong with basic. I'm not one for detail for its own sake, especially when it's unlikely to be seen. The rear compartment does come with some interior detail and it's quite good, though I did a bare minimum job on it as it can't be seen. It might have been nice to have hinged rear doors so that it could be seen - and that's the kind of detail missing from this kit. The cab detailing is practically non-existent, but there's just enough for my purposes with the doors closed.

What I like about this kit is that there are no annoying sub assemblies split into many parts. Another way to look at this (and other ICM kits) is that it's no nonsense. It does what it says on the tin. And in this case, that's all that really matters. They've picked a really nice subject that looks good even in all over green, and given us something that really stands out.

This is basically three small kits in one. There's the chassis assembly, which is neither difficult nor onerous, the cab, and the rear compartment, which can all be built and painted separately, and then very little is required when it all comes together. For this I've used basic misting techniques and oil paint streaking, with a subtle dry-brushing, and though I've gone to town on the rear compartment, the rest largely speaks for itself.

The rear compartment could have done with a bit more exterior detail as it looks like a plywood box and it has some accuracy issues, but I expect it's presently beyond ICM's capability, and would have driven the price up. ICM kits are easy on the wallet, while most other brands are now costing more than they should. There's certainly a place for merely adequate kits at affordable prices.

But, you know, never mind all that. I mean look at it. It's fantastic and I love it. It was fun to build, challenging enough, and the result is glorious. I'm totally happy with it and I would build one again. If ICM survives the war in Ukraine then they're likely to be a fixture in any modeller's stash. They do a wide range of off-beat stuff that you just can't get anywhere else. Their box art is also seriously cool. It would be a great loss if they don't survive.

Friday, 11 March 2022

1:35 Ryefield Models Panther G


I've put this one off for quite a long time. I took one look at the number of parts and the individual track links and chickened out. I enjoy the painting more than the building which is why I'm more of a Tamiya fan. This is just balls-achingly fiddly, where components that could just as easily be one part are split into five.

On this kit it makes very little sense since it isn't a full interior kit, so there is no merit to adding the extra interior detail, and the gun assembly is so fragile it breaks when trying to shoehorn it into the absurd turret pivoting mechanism which plugs into two poly parts that don't fit at all. It's neither fish nor fowl.

Ironically, the thing that put me off the most (the individual track links), ended up being less hassle than I imagined once I managed to undo my initial mistakes, and now I may never go back to the bog standard rubber band style tracks. The reward is worth it and it really makes the final result.

Having elected not to go to town in interior detail that wouldn't be seen, I did more or less the bare minimum on this one, and there must be a hundred parts left over. I'd have gone mad otherwise, particularly since the instructions are not clear and most of the photo-etch parts are either useless or completely pointless.

Painting it wasn't so much fun either. German armour never is. I think it's the one instance where you can't get away with cheapo Chinese splatter guns. After four attempts I ended up going for alternate stripes masked with blu-tac, which is good as far as it goes but I don't feel it does justice to a kit of this price and quality. Another reason I put off doing it. It has to be done well or not at all.

Grumbles aside though, the added exterior fine detail really is good and if it sat aside the older, cheaper Tamiya Panther, the difference in quality would be obvious. The weld lines and the machine-gun ports set this apart from the competition. 

Weathering this one was challenging. I again attempted the hairspray technique for chipping but whenever I try it, it just looks like a defect rather than intentional weathering. There are other ways to achieve the same thing, and it's better to not do it than to overdo it. Mind you, I can see why so many modellers over-weather their vehicles being that most of the little features are missed by the camera, and if you really want to show off your skills, you have to go larger than life.

As a project this took at least three times longer than something else of its size. It is a high quality kit but there are some serious faults, not least the bar suspension system which is laborious and brittle, and the wheel holes need drilling out so they fit. For a kit so accurate in terms of detail, the kit engineering isn't very good. When you build a recent Airfix kit you know they've really thought about the user experience. This one is just a string of endless difficult chores.

As for the final result, it really belongs in a diorama. Without added stowage and tools, there's only so much you can do with the base kit. For a large vehicle it doesn't have much free surface area to play with weathering techniques. The King Tiger is probably a better subject.

This kit is hard work, quite expensive, and quite expensive in paints, and if you're going to do a Panther, I'd be tempted to say avoid this one - but the alternatives are inferior. The Academy/Airfix Panther is ok (much easier to build) but it isn't that much cheaper than Ryefield and the detail is nowhere close. The Tamiya is basic and low quality. But then if you are going to this much expense and this much bother, you might as well go all in on the Takom with the full interior. I have that one in the stash for when I'm next feeling masochistic.

Sunday, 20 February 2022

1:48 Airfix DeHavilland Chipmunk


This should have been a quick and fun little project. It wasn't. Some builds are just cursed. There's nothing at all wrong with the kit, except for the terrible canopy which comes in four parts and requires a four part jig to stick together. I don't know what they were thinking. 

I first used Tamiya's extra thin cement which I have never successfully glued anything with. That didn't work, so I used PVA which didn't work either, so defaulted to the Revell Contacta which has the same melting effect as Napalm.

Painting the canopy wasn't easy either. Masking it didn't really work (and I wasn't going to spend £8 on a die cut mask) and all of the paint peeled off during the weathering process so I ended up doing it freehand. Consequently, the canopy is a bit of a bodge, which ruins an otherwise lovely kit.

On this build, for ease of colour matching I used the recommended Humbrol acrylics, which are ok, but a pig to clean out of the airbrush. They have a tendency to dry like a thin layer of polyurethane film and are not as resilient as Tamiya to white spirit during weathering. I ended up having to do an emergency repaint as the paint peeled off. 

It didn't help that I'm still using the hated Vallejo primer. Once this bottle is done I'm never buying another Vallejo product again. I have absolutely no idea why Vallejo products are popular because they've sucked the fun out of every project I used them on.

Knowing what I know now, I could probably have a second stab at this kit and produce it to perfection, and I probably will because it's such a pleasing little aeroplane and one that really suits super-detailing if you're into all that. I could develop a thing for piston powered monoplanes.

I have to say that Airfix is really knocking it out of the park lately. I've had my foibles with some of the new generation kits, but on the whole they're excellent, and I'm increasingly hesitant to take on older kits. The latest Vulcan is a triumph, and this summer sees a 1:48 Buccaneer and Avro Anson. They really are listening to their customers.